Key Takeaways
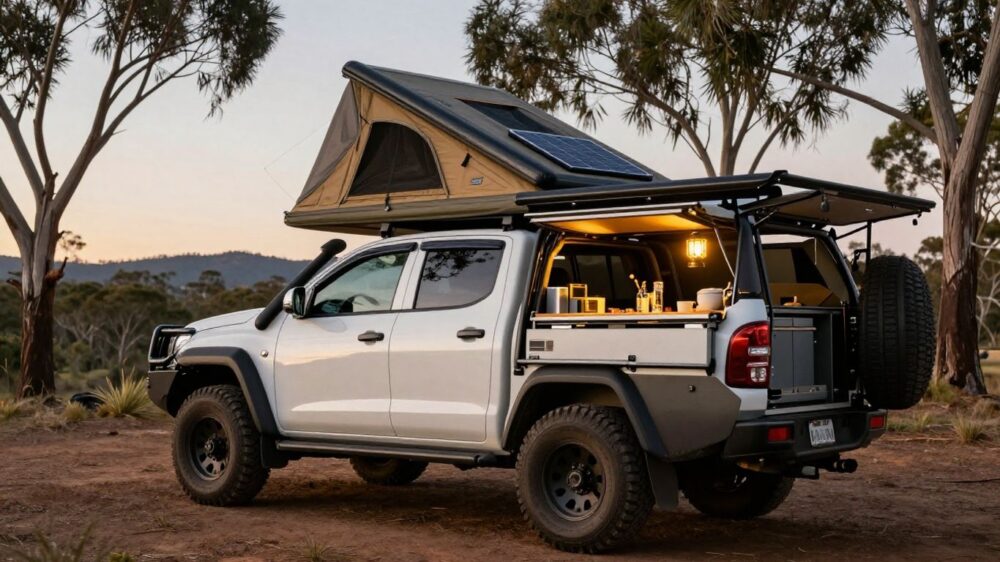
A ute can become a remarkably comfortable weekend touring base without turning into an oversized project. I would start with storage and shelter, then add power, water, recovery equipment, and the small comforts that make camp easier.
- Choose a canopy and drawer layout that keeps everyday gear accessible.
- Treat the rooftop tent, battery, and water system as one weight-management exercise.
- Improve lighting, recovery equipment, and tires before heading far from help.
- Build the kitchen and food storage around simple, repeatable camp routines.
- Protect the ute bed so each trip is easier to clean up afterwards.
1. Add a practical ute canopy
A canopy is often the foundation of useful camping upgrades for a ute. It gives me a dry, lockable place for equipment and helps separate work gear from bedding, cooking items, and recovery kit. Before buying one, I think about the height, side access, roof load, and whether I still need to carry bulky items during the week.
I prefer a layout that lets me reach the gear I use most without unloading half the vehicle. Side-opening doors can make a real difference at a crowded campsite, while internal shelves or tie-down points stop loose bags sliding around. I also check that the canopy seals properly and allows enough room for ventilation when conditions are warm.
Weight deserves attention from the start. A canopy, rooftop tent, drawers, water, food, and passengers can add up quickly, so I keep a running list of what each upgrade weighs. The best setup is not the one with the most equipment; it is the one that carries the essentials without making the ute awkward on the road.
2. Install a slide-out drawer system
Drawers turn a messy tub into a place where I can find things with cold hands, poor light, or a tired head. They are especially useful for small tools, cooking equipment, spare parts, and camp items that otherwise disappear beneath larger bags. I measure the available space carefully, including wheel arches and the clearance needed to open the tailgate.
I group equipment by task rather than by object. One drawer might hold recovery accessories and gloves, while another carries the stove, utensils, and cleaning supplies. A shallow top surface can also provide a handy platform for packing or preparing food, although I avoid treating it as a permanent workbench if it blocks access to the rest of the tub.
Before fitting drawers, I consider drainage, dust, and access from both sides. A neat system is not much help if I need to unpack the whole ute to reach a jack or first-aid kit. Easy access matters most when rain is coming in, the track is rough, or I am trying to pack up before sunrise.
3. Upgrade to a comfortable rooftop tent
A rooftop tent can make short trips feel more like a proper break because the sleeping space is already organised. I look for a mattress that suits my sleeping style, a ladder that feels stable, and enough room to change clothes without wrestling with the fabric. The tent also needs to suit the vehicle’s roof load and the racks or platform carrying it.
Comfort is more than mattress thickness. Ventilation, insect screening, a simple way to store bedding, and a cover that is manageable in wet weather all affect how willing I am to use it. I also practise opening and closing the tent at home, because a setup that is fiddly after a long drive will soon become an unused accessory.
The extra height changes how I use the ute. I check the total height before entering garages, car parks, or tracks with low branches, and I leave room around the tent when packing the canopy. I also keep the ladder and tent fabric clear of sharp gear so the sleeping setup remains a refuge rather than another storage problem.
4. Fit an auxiliary battery and solar setup
An auxiliary battery gives me a separate source of power for camping equipment, rather than relying on the vehicle’s starting battery. I plan the system around what I actually run, such as a fridge, lights, or small charging devices, and I make sure the installation is protected from heat, water, and movement. Professional installation is sensible when the wiring is beyond my knowledge.
Solar can help replace energy during a multi-day stay, particularly when the vehicle is parked for much of the day. I choose a panel and controller that suit the battery system, then give the panel a clear place to work without constantly moving it. Cables need to be routed neatly and protected from sharp edges, dust, and curious camp visitors.
I keep expectations realistic and monitor the system rather than assuming it will cope with anything. A power display helps me see whether I am using more than I am replacing, while fuses and isolation controls make the setup easier to manage. Good power planning is mostly about restraint: fewer unnecessary devices mean a simpler, more dependable camp.
5. Improve your ute’s lighting
Better lighting makes camp chores less frustrating and helps me inspect the ute after a rough section of track. I think about separate jobs: lighting inside the canopy, lighting around the tailgate, and lighting for setting up shelter. Warm, restrained light is often more pleasant around camp than an overly bright beam pointed at everyone’s face.
I place lights where they illuminate a work surface without creating deep shadows. A switch near the tailgate is convenient, and a red or low-output option can preserve night vision when I am moving around after dinner. I also protect fittings from knocks and avoid routing wires where drawers, doors, or stored tools can catch them.
Driving lights and reverse lights should be chosen and fitted with care, with attention to local road rules and the vehicle’s existing wiring. I do not use campsite lighting as a substitute for safe driving. A headlamp remains useful as well, since it follows me when I need both hands to change a tire or find a dropped item.
6. Carry more water with an onboard tank
Water is one of the first things I plan for on a remote weekend, and an onboard tank can make carrying it less awkward. I choose a location that keeps the weight low and secure, rather than placing a heavy container high on the canopy. The tank, hose, fittings, and mounting hardware all need protection from movement and damage.
I keep drinking water separate from water used for washing or general camp jobs. A dedicated tap makes filling bottles and a kettle easier, while a short hose can help with cleanup without turning the whole side of the ute into a puddle. I clean and inspect the system before trips rather than assuming stored water will remain suitable indefinitely.
The tank should be included in the ute’s overall load calculation, especially when it is full. I prefer filling according to the trip rather than carrying maximum capacity every weekend. That small habit saves weight on short journeys and leaves more attention for checking the basics: lids closed, fittings tight, and water secured before leaving.
Carry the water you need, secure it low, and make every outlet easy to clean.
After a few trips, the right capacity becomes obvious. I note how much water I used for drinking, cooking, and washing, then adjust the next load instead of guessing. That approach keeps the system practical and stops a useful upgrade becoming unnecessary weight.
7. Choose all-terrain tires and recovery gear
All-terrain tires can suit a ute that moves between sealed roads, gravel, sand, and maintained tracks. I choose them for the conditions I actually drive in, rather than for an aggressive appearance. Load rating, size, road manners, noise, and pressure adjustment all matter when the vehicle is carrying camping equipment.
Recovery gear should match the ute and be stored where I can reach it without unloading everything. I carry equipment suited to the vehicle’s rated recovery points and learn how to use it before I need it. A compressor, tire gauge, repair supplies, shovel, and gloves are useful companions, but none replaces careful driving and checking the track first.
I keep a simple recovery check in mind before leaving the bitumen:
- Confirm the tires are in good condition and correctly inflated for the load.
- Check that rated recovery points are accessible and undamaged.
- Store straps, shackles, and gloves together in a marked bag.
- Tell someone where I am going when the route is remote.
That preparation does not make difficult terrain harmless, but it reduces the chance of improvising under pressure. I also avoid carrying equipment that I cannot identify or operate, because unfamiliar recovery gear can create more confusion than help.
8. Build a compact outdoor kitchen
A compact outdoor kitchen works best when it follows the way I already cook at camp. I need a stable cooking surface, a place for utensils, room to wash up, and somewhere to put hot cookware. The design can be simple: a folding table, a stove, a small tub, and organised storage are often enough for a weekend.
I store cooking equipment together so setting up takes minutes rather than a full unpack. A dedicated drawer or crate holds the stove, fuel, pan, board, utensils, and cleaning cloths, while dry ingredients stay in sealed containers. I keep the cooking area away from the sleeping space and make sure the stove is used only in a suitable, well-ventilated location.
The best kitchen is easy to clean at the end of the night. I avoid carrying more cookware than I use and plan meals that share ingredients without needing elaborate preparation. Once everything has a place, packing up becomes a short routine instead of a hunt through the canopy.
9. Add a fridge and reliable food storage
A camping fridge is worthwhile when I make regular trips or want more control over fresh food. I place it where I can open the lid or door without rearranging the whole vehicle, and I allow airflow around the unit. The power supply also needs to suit the battery setup rather than being treated as an afterthought.
Food storage should protect ingredients from heat, dust, leaks, and animals. I use sealed containers for dry goods and keep a separate bag for rubbish, because a small spill inside a drawer can make the entire ute unpleasant. A simple inventory before departure prevents buying duplicates and helps me pack food that will actually be eaten.
I cool the fridge before loading it and avoid opening it repeatedly just to browse. Heavy items stay low, bottles are secured, and anything likely to leak gets its own container. These habits sound ordinary, but they make a bigger difference to a relaxed morning than adding another gadget.
10. Protect the bed with a durable liner and floor system
The ute bed takes plenty of punishment from grit, wet equipment, sharp tools, and shifting loads. A durable liner gives the surface some protection, while a removable floor system can create a flatter and cleaner base for drawers, crates, or sleeping equipment. I choose materials that can be swept or washed without trapping every grain of sand.
I pay attention to drainage and access to existing tie-down points. A floor that blocks those points may look tidy but make it harder to secure a load properly. I also leave room for inspection underneath, since trapped moisture and debris can cause problems that are hidden by a permanent covering.
The final test is everyday use. I load the ute as I would before a trip, check that the tailgate and canopy doors still work, and make sure heavy items cannot slide forward under braking. A protected bed should make cleaning and packing simpler, not add another delicate layer to work around.
Conclusion
I would build these camping upgrades for a ute in stages, starting with secure storage and a sensible load plan before adding comfort items. The result does not need to look elaborate; it needs to make driving, cooking, sleeping, and packing up easier. When every piece has a clear job, a weekend away starts with less fuss and leaves more room to enjoy the road.